20 Şubat 2012 Pazartesi

Linux Dosya Boyutu Öğrenme

[root@fedora ~]# du -h
[root@fedora ~]# du -s
[root@fedora ~]# du -sh
[root@fedora ~]# du -sh *
[root@fedora ~]# du -ch *.txt

-a, --all write counts for all files, not just directories
--apparent-size print apparent sizes, rather than disk usage; although the apparent size is usually smaller, it may be larger due to holes in (`sparse') files, internal fragmentation, indirect blocks, and the like
-B, --block-size=SIZE use SIZE-byte blocks
-b, --bytes equivalent to `--apparent-size --block-size=1'
-c, --total produce a grand total
-D, --dereference-args dereference FILEs that are symbolic links
-H like --si, but also evokes a warning; will soon change to be equivalent to --dereference-args (-D)
-h, --human-readable print sizes in human readable format (e.g., 1K 234M 2G)
--si like -h, but use powers of 1000 not 1024
-k like --block-size=1K
-l, --count-links count sizes many times if hard linked
-L, --dereference dereference all symbolic links
-P, --no-dereference don't follow any symbolic links (this is the default)
-0, --null end each output line with 0 byte rather than newline
-S, --separate-dirs do not include size of subdirectories
-s, --summarize display only a total for each argument
-x, --one-file-system skip directories on different filesystems
-X FILE, --exclude-from=FILE Exclude files that match any pattern in FILE.
--exclude=PATTERN Exclude files that match PATTERN.
--max-depth=N print the total for a directory (or file, with --all) only if it is N or fewer levels below the command line argument; --max-depth=0 is the same as --summarize
--help display this help and exit
--version output version information and exit

NAME
du - estimate file space usage
Usage: du [OPTION]... [FILE]...
Summarize disk usage of each FILE, recursively for directories.

More information on du command:
# info du
# man du
# du --help
 

Ubuntu Web Sunucu Yedek Almak

tar -cvpzf httpdocs.tar.gz /httpdocs
 
tar -cvpzf backup.tar.gz --exclude=/backup.tar.gz --exclude=/proc --exclude=/lost+found --exclude=/sys --exclude=/mnt --exclude=/media --exclude=/dev /
  • tar - is the command that creates the archive. It is modified by each letter immediately following, each is explained bellow.
    • c - create a new backup archive.
    • v - verbose mode, tar will print what it's doing to the screen.
    • p - preserves the permissions of the files put in the archive for restoration later.
    • z - compress the backup file with 'gzip' to make it smaller.
    • f <filename> - specifies where to store the backup, backup.tar.gz is the filename used in this example. It will be stored in the current working directory, the one you set when you used the cd command.
  • --exclude=/example/path
tar -xvpzf /home/test/httpdocs.tar.gz -C /
  • x - Tells tar to extract the file designated by the f option immediately after. In this case, the archive is /home/test/backup.tar.gz
  • -C <directory> - This option tells tar to change to a specific directory before extracting. In this example, we are restoring to the root (/) directory.

Yeni Sitede Yapılması Gerekenler

19 Şubat 2012 Pazar

FPDF error: Alpha channel not supported

Many PNG files have an Alpha channel imbedded in the file. The process listed below removes that Alpha Channel from the PNG file.

1. Open the PNG file in a graphics program
2. Save as a JPG format and close the file
3. Reopen the new JPG file in the graphics program
4. Save as a PNG file again
5. Reattach the new PNG file to your Sales Category

18 Şubat 2012 Cumartesi

Contact Form 7 Resim Yükleme Özelliği

[file your-file filetypes:pdf|txt limit:2mb]

Contact Form 7 applies default restrictions for file type and file size when you do not set the filetypes: and limit: (file size) options explicitly. Default acceptable file types (extensions) are: jpg, jpeg, png, gif, pdf, doc, docx, ppt, pptx, odt, avi, ogg, m4a, mov, mp3, mp4, mpg, wav, and wmv. Default acceptable file size is 1 MB (1048576 bytes).
multiple
[your-file][your-another-file]
 
temp folder
You can also change the path of the temporary folder by setting the WPCF7_UPLOADS_TMP_DIR constant in your wp-config.php like this:
define( 'WPCF7_UPLOADS_TMP_DIR', '/your/file/path' );
 

12 Şubat 2012 Pazar

Wordpress'te Resim Yönetimi

Multiple Hostnames

There can also be user improvements by splitting static files between multiple hostnames. Most browser will only make 2 simultaneous requests to a server, so if you page requires 16 files they will be requested 2 at a time. If you spread that between 4 host names they will be requested 8 at a time. This can reduce page loading times for the user, but it can increase server load by creating more simultaneous requests. Also, known is "pipelining" can often saturate the visitor's internet connection if overused.
Offloading images is the easiest and simplest place to start. All images files could be evenly split between three hostnames (assets1.yoursite.com, assets2.yoursite.com, assets3.yoursite.com for example). As traffic grows, these hostnames could be moved to your own server. Note: Avoid picking a hostname at random as this will affect browser caching and result in more traffic and may also create excessive DNS lookups which do carry a performance penalty.
Likewise any static JavaScript and CSS files can be offloaded to separate hostnames or servers.

These junk image files will accumulate at an exponential rate, and over time can really start hogging valuable storage space. Unless you have an explicit reason to keep certain files, you’re better of deleting them and keeping your WordPress house clean and tidy.
If you don’t want to trawl through your server and delete all of these images files manually, you could check out the Additional Image Sizes plugin.

The image bloat solution

Once you’ve cleared out all those unused image files from your server, this a quick and painless solution to stop WordPress from creating them in the first place.

Simply venture into the Settings > Media panel in the left of your WordPress dashboard. Here you can specify the default dimensions of each pre-defined image size: Thumbnail, Medium and Large. By changing the height and width dimensions to zero, you’re telling WordPress not to create the image file.


And that’s all there is to it.
Note: if you’re going to do this, it’s important that you have the correct size image when you initially upload it. If you only use one image size throughout all your posts and pages, you could consider plugging your desired dimensions into the ‘large’ or ‘medium’ image size, and getting rid of the other two.
This will save you the trouble of resizing images before you upload them, but you’ll be left with one extra image file on your server every time.

Change default image  uploading folder in WordPress

This step involves in setting WordPress to change the default uploading folder for the post images. log-in to your WordPress dashboard. Click on

“Miscellaneous”
“Media” under “Settings” from left side of the dashboard.
Fill up the fields as follows: Store uploads in this folder : images Full URL path to files : http://images.yourdomain.com


Update the old post images location

UPDATE wp_posts SET post_content = REPLACE(post_content,'http://www.yourdomain.com/wp-content/uploads/','http://images.yourdomain.com/')

Click on “GO”. This query will replace “http://www.yourdomain.com/wp-content/uploads/”  with “http://images.yourdomain.com/” in all the image location url. To update the images links in the media library run the following sql command

UPDATE wp_posts SET guid = REPLACE(guid,'http://www.yourdomain.com/wp-content/uploads/','http://images.yourdomain.com/')

Redirect the old images link to to subdomain

You have completed all the task with your site and database. But Google has crawled and indexed your old images. So redirect the old image urls to the new image urls to let Google know that those images are same. To do so ad the following line in your .htaccess file 

RedirectMatch 301 ^/wp-content/uploads/(.*)$ http://images.yourdomain.com/$1

Reminder: Backup your .htaccess file before any modification. That’s all to set your subdomain as post-images upload location. Any question is always well come. Put your feedback in the comment section.

Reduce the Size of Images

The load put on servers these days is tremendous with people using lots of images in each article. Reducing the size of images should thus speed up your blog too.One step to do this is to use an image editing software. With this software you can reduce the height and the width of a picture. This is important as this is directly related to the image’s size. If you want a picture to take up the whole width of your content section then go ahead and scale its width down to 500 pixels as this is the usual content section width.

Another step to implement is to use software that actually reduces the size of an image even further. Smush.it is a great web site which decreases the size of a picture to a minimum without reducing its quality.
Now there is also a WordPress plug-in available that will take all these steps automatically. WP Smush.it sounds great and probably is a huge time saver.

Hotlinking Protection

.htaccess file

RewriteEngine on
RewriteCond %{HTTP_REFERER} !^http://(.+\.)?www.siteadınız\.net/ [NC]
RewriteCond %{HTTP_REFERER} !google. [NC]
RewriteCond %{HTTP_REFERER} !^$
RewriteCond %{HTTP_REFERER} !search?q=cache [NC]
RewriteCond %{REQUEST_URI} !^/yasak.jpg$
RewriteRule .(gif|jpg|png|mp3|swf)$ /yasak.jpg [NC,L]


Kaynak

10 Şubat 2012 Cuma

Hosting Firmalarının Kısıtlamaları

Godaddy

Storage and Plan Limits
All web hosting plans, including plans that offer unlimited disk space, are subject to a limit of no more than 500,000 inodes per account (for Linux® hosting accounts) or 500,000 files and folders per account (for Windows® hosting accounts).  Any account that exceeds this limit will be issued a network violation warning and subject to suspension if no action is taken by the customer to reduce the number of inodes or files and folders (as the case may be).
All web hosting plans, including plans that offer unlimited databases, are subject to limits of (i) no more than 1,000 tables per database and (ii) no more than one gigabyte (“GB”) of storage per database.  Any database that exceeds these limits will be issued a network violation warning and subject to suspension if no action is taken by the customer to reduce the number of tables or gigabytes (as the case may be).
Sözleşme

Hostgator

7a.) Resource Usage
User may not:
1) Use 25% or more of system resources for longer then 90 seconds. There are numerous activities that could cause such problems; these include: CGI scripts, FTP, PHP, HTTP, etc.
 8) Run cron entries with intervals of less than 15 minutes.
 9) Run any MySQL queries longer than 15 seconds. MySQL tables should be indexed appropriately.


7b.) INODES
 The use of more than 250,000 inodes on any shared account may potentially result in a warning first, and if no action is taken future suspension. Accounts found to be exceeding the 100,000 inode limit will automatically be removed from our backup system to avoid over-usage, however databases will still be backed up. Every file (a webpage, image file, email, etc) on your account uses up 1 inode.
Sites that slightly exceed our inode limits are unlikely to be suspended; however, accounts that constantly create and delete large numbers of files on a regular basis, have hundreds of thousands of files, or cause file system damage may be flagged for review and/or suspension. The primary cause of excessive inodes seems to be due to users leaving their catchall address enabled, but never checking their primary account mailbox. Over time, tens of thousands of messages (or more) build up, eventually pushing the account past our inode limit. To disable your default mailbox, login to cPanel and choose "Mail", then "Default Address", "Set Default Address", and then type in: :fail: No such user here.
Sözleşme

Netkira

(3) Use over 25% of system resources, including but not limited to Memory, CPU, Disk, Network, and Bandwidth capacity, for longer than 90 seconds in any consecutive 6 hour period.
(10) Run cron entries with intervals of less than 15 minutes.
(11) Store over 100,000 files.
(13) Run any MySQL queries longer than 15 seconds.
Sözleşme

9 Şubat 2012 Perşembe

Wget ile TXT İçindeki Linkleri İndirme

$ vi /tmp/download.txt

Append a list of urls:
http://www.cyberciti.biz/download/lsst.tar.gz
ftp://ftp.freebsd.org/pub/sys.tar.gz
ftp://ftp.redhat.com/pub/xyz-1rc-i386.rpm
http://xyz.com/abc.iso

Type the wget command as follows:
$ wget -i /tmp/download.txt

WP-Table Reloaded Özelleştirme

1
.wp-table-reloaded-id-1 .column-1 {
text-align: center!important;
vertical-align: middle!important;
}
2
.wp-table-reloaded-id-1 .row-1 td {
text-align: center!important;
vertical-align: middle!important;
}
3
.wp-table-reloaded-id-3 .column-1 {
width: 200px;
}
.wp-table-reloaded-id-3 .column-2 {
width: 50px;
}
.wp-table-reloaded-id-3 .column-3 {
width: 200px;
}
.wp-table-reloaded-id-3 .column-4 {
width: 50px;
}
.wp-table-reloaded-id-3 .column-5 {
width: 200px;
}
.wp-table-reloaded-id-3 .column-6 {
width: 50px;
}
.wp-table-reloaded-id-3 .row-1 th {
text-align: center!important;
vertical-align: middle!important;
}
.wp-table-reloaded-id-3 th, .wp-table-reloaded-id-1 .sorting {
background-color: #ffffbb!important;
}
.wp-table-reloaded-id-3 td {
font-family: Arial;
font-size: 11px;
color: #000000;
}
.wp-table-reloaded-id-3 td {
padding: 1px!important;
}
.wp-table-reloaded-id-3 .column-2 {
text-align: center!important;
vertical-align: middle!important;
}
4
.wp-table-reloaded-id-1 {
width: auto;
margin: 10px auto;
}

Sleep (Uyku), Hibernate (Hazırda Beklet)

Sleep (RAM On) : All of the open programs, documents and files are preserved in system RAM and the rest of the system is powered off. Because only memory is powered, Sleep consumes a very small amount of power—typically less than 1W on a mobile PC and typically less than 3W on a desktop PC. The primary benefit of Sleep is that resume is very fast—most systems resume from sleep in less than 2 seconds.

Hibernate (RAM Off): All of the open programs, documents and files are copied from system RAM to the hard drive. The resulting file is called the Hiberfile. After RAM is copied into the Hiberfile, all of the PC is powered off. Hibernate is most often used on mobile PCs because it consumes nearly 0W on most laptops, and even if the battery does eventually drain, all of the open programs and documents are saved in the Hiberfile. As RAM continues to grow, and as some PCs have limited storage, Hibernate might not be the best option for folks. (As a quick tip, the disk cleanup wizard, or powercfg –hibernate off, can remove the disk space pre-allocated to hibernate).

Diskteki Boş Alanı Doldurmak

fsutil komutu kullanarak
yönetici olarak komut istemi açın
fsutil file createnew F:\Dummy [boş alan miktarı]
komutu girilir.

Dummy oluşurulacak dosyanın adı, boş alan miktarı byte cinsinden girilir. F doldurulacak diskin sürücü harfidir.

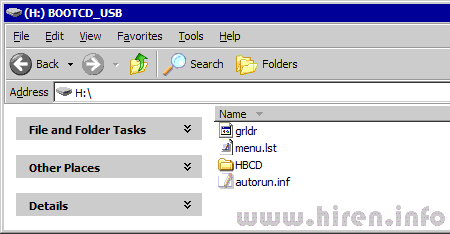
USB’den Çalışan Hiren’s Boot CD

Hiren’s Boot CD 9.7 ve üzeri versiyonlarda kullanılabilecek yöntem.
USB Disk Storage Format


Grub4Dos


HBCD içerisindeki grldr ve menu.lst dosyaları flash diskin ana dizinine atılır. HBCD flash diske kopyalanır.


Teamspeak 3 Server'ı Kısıtlı Yetkilerle Çalıştırmak

screen
./ts3server_minimal_runscript.sh inifile=ts3server.ini

Tam kurulum için
HowTo Install Teamspeak3 Server on Linux w/ Avatars and Transfers working.


Tampon Bellek Taşmalarına Karşı

Yazılımlara yönelik en yaygın saldırılardan olan tampon bellek taşmalarına karşı koruma için Windows DEP (Veri İşletim Önlemesi) ve ASLR (Adres Alanı Yerleşim Gelişigüzelleştirme) işlevleriyle donatılmıştır. DEP, tehlikeli kodların bellekte çalıştırılmasını önlerken ASLR yazılım bileşenleri için güvenilir bir depolama alanı sunuyor. Process Explorer programı ile yazılımların ASLR destekleyip destekelemediği öğrenilebilir.
Windows XP SP2′den beri Windows DEP tekniğinden faydalanıyor. Böylece belleğin belirli kısımlarını işlemci işletilemez olarak algılıyor. Eğer bir saldırgan buradan kod çalıştırmaya kalkışırsa işlemci bunu Windows’a bildiriyor ve uygulama sonlandırılıyor.
Windows Vista’dan bu yana ASLR adres alanlarını güvenli bir biçimde dağıtıyor ve böylece saldırganlar uygulamaların nereden çalıştırıldığını öğrenemiyor. Böylece sistem önceden tahmin edilir olmaktan çıkıyor. Bu teknik bellek taşmalarını güçleştiriyor ve DEP’le birleştiğinde, zararlı kodların çalıştırılmasını önlüyor.
Microsoft’un Enhanced Mitigation Experience Toolkit aracı DEP ve ASLR’yi tüm programlar için etkinleştirebiliyor.

Download
Process Explorer
Enhanced Mitigation Experience Toolkit

USB’den Windows Kurulumu

USB’den Windows kurabilmek için USB üzerinde yapılması gereken değişiklikler. Netbooklar, Optik sürücüsü çalışmayan bilgisayarlarda işe yarıyor. 

Görev Zamanlayıcıda CCleaner'ı Kullanmak

CCleaner'ın düzenli olarak bilgisayarı temizlemesini sağlamak.
Başlat - Tüm Programlar - Donatılar - Sistem Araçları > Görev Zamanlayıcı